Overview
Time to complete: 2–10min; Level of difficulty: Beginner
In this activity we will learn how to setup a computer running Linux, Windows, or OSX to upload programs to an Arduino UNO board. The steps can be followed using other Arduino-compatible development boards.
List of Materials
- 1 x Arduino Uno R3
- 1 x USB-A to USB-B Male / Male Cable
Installing the Arduino Software
We start by downloading the Arduino IDE or Arduino Environment (both short for Integrated Development Environtment), which is a computer program that'll allow us to write code and upload it to an Arduino development board. At the time of this writing, the latest version of the program is (1.6.8).
The program is available for OS X, Linux, and Windows. The download links are availble at:
https://arduino.cc/en/main/software.
Once downloaded, installing the Arduino IDE is no different than installing any other program or application on our system.
Mac OS X
Double click the zipped file arduino-1.6.8-macosx.zip to extract the Arduino app. You can execute it from it's current location, but it is common practice to move it to your Applications folder. The quickest way is to drag and drop it using Finder.
Windows
You can download either a Windows installer if you have administrative rights on your system, or a .zip file containing all the necessary files if are unable to install programs.
If you're able to run the Windows installer, you'll be prompted for installing the USB drivers, which are necessary for communicating with the Arduino boards. Select Install from the options.
Once the installation finishes, the program can be accessed through the Start menu as it's customary.
If your only option is to download the .zip file, don't worry. Below we explain how to manually install the USB drivers. Make sure you extract the files to a known location. Typically we would create the directory C:\Program Files (x86)\Arduino and move all the extracted contents there. However, for non-administrator users this may not be possible (any other location like Documents or Downloads works well).
To run the Arduino IDE in this case, just make a note of the location of the files (as a reminder) and double-click the executable arduino.exe.
Linux
Before installing Arduino on Linux, we'll need to quickly check if we have a 32-bit or 64-bit version of the Operating System. This can be done by opening the Terminal (CTRL+ALT+T on default Ubuntu installations), and entering the command:
uname -aIf the system is 32-bit, we'll get i686 in the returned string:
Linux ubuntu 3.16.0-23-generic #31-Ubuntu SMP Tue Oct 21 17:56:17 UTC 2014 i686 i686 i386 GNU/Linuxwhereas a 64-bit system will return:
Linux ubuntu 3.16.38-23-generic #31-Ubuntu SMP Tue Oct 21 17:56:17 UTC 2014 x86_64 x86_64x86_64 GNU/LinuxAfter downloading the version corresponding to our system and uncompressing it to a known location (e.g., /home/username/Downloads), we can run it by opening a Terminal and entering:
cd /home/username/Downloads/arduino-1.0.6/./arduinoConnecting the Board
Using the USB-A to USB-B cable, connect the Arduino development board to a USB port on your computer. If the port is working properly, you should see a green LED on the Arduino light-up immediately.
Installing the USB Driver
Similar to when we first connect a USB printer to our computers, we'll need drivers that'll allow communicating with the connected Arduino development board. Luckily, in the case of most Linux distros and OS X, the drivers are pre-installed so the Arduino boards are recognized as soon as they're connected.
In this step we just want to verify that the connected Arduino board is recognized by the computer. To do this we can:
OS X
Open the Terminal.App (use the Finder to Navigate to Applications → Utilities → Terminal) and type the command:
ls /dev/tty.*This returns a list of peripherals currently connected to the computer. Typically, Arduino boards appear listed as /dev/tty.usbmodem where consists of a combination of letters and numbers such as fa131 in the image below. Note that if we issue the command before connecting the board, there usually aren't any usbmodem devices available.
Linux
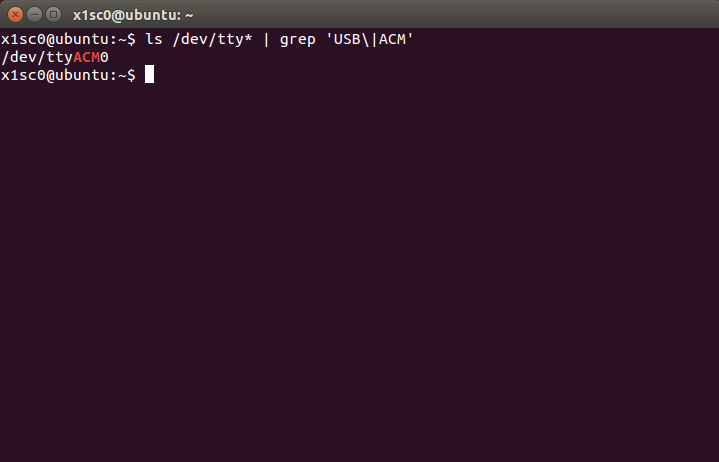
Similar to OS X we can open up a Terminal window, and issue the same command:
ls /dev/tty* | grep 'USB\|ACM'On Linux, Arduino boards are listed as either /dev/tty.ACM or /dev/tty.USB where is a number. Issuing the command once prior to connecting the USB is a quick way to narrow down which entry corresponds to the Arduino board.
Windows
On Windows, sometimes the USB drivers need to be manually installed, particularly if you've downloaded the .zip version of the Arduino Environment as described aboce. In order to ensure that the Arduino board is recognized we can:
- Open the
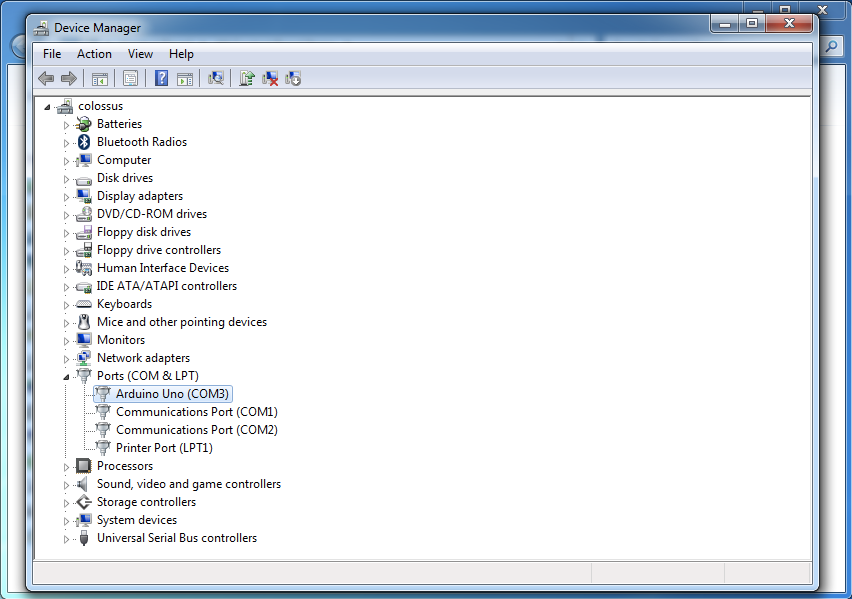
Device Manager(available throughControl Panel → System & Security → Device Managerin theSystemsection) - Under the
Ports (COM & LPT)entry, there should be an open port namedArduino UNO COM
- Right click on the
Arduino UNO (COM )port and choose theUpdate Driver Softwareoption - Then choose the option
Browse my computer for Driver software - Select the driver file named arduino.inf located in the Drivers folder located inside the extracted Arduino environment .zip file
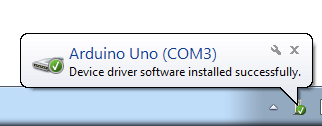
After the driver is installed, we should see the message Device driver successfully installed:
Testing our Setup
We're now ready to load our programs to the Arduino Board. To ensure that everything's workin properly, try blinking the built-in LED next!
Troubleshooting
During installation of the Arduino Environment, some problems may occur. We've listed the most common, and we'll continue to update the list as we come across any other issues.
Mac OS X
- Opening the Arduino App
To protect us from Malware, Mac OS X checks that programs we install crom from either the App Store or from identified developers. Thus, sometimes the message Arduino can't be opened because it was not downloaded from the Mac App Store. may appear.
To solve this, simply go to System Preferences → Security & Privacy → General and either select Open Anyway or change the preference Allow apps downloaded from: to Mac App Store and identified developers.
Alternatively, in Finder, control-click or right click the icon of the app, and select Open from the top of contextual menu that appears. This will allow you to bypass the check performed by the GateKeeper program, which is what prevents the Arduino App from opening.
Linux
- Installing dependencies
Before being able to run the Arduino environment, we'll need to make sure that we have Java installed. In Ubuntu, we can do this through the Terminal (other options are available as well) by entering the command:
sudo apt-get update && sudo apt-get install openjdk-7-jre
Windows
Sometimes, when we plug in our Arduino board to the computer, we get the message Device driver software was not successfully installed. Thus, we need to update the driver in order to communicate with the Arduino board.
In this case, when we open the Device Manager (available through Control Panel → System & Security → Device Manager in the System section), the Arduino board is not listed in the Ports (COM & LPT) section, but rather under Other devices as Unknown device.
To fix this, we right click on the Unknown device and choose the Update Driver Software option. Then follow the instructions on the Installing the USB Drivers step.